
Users & Account Security
PrivateLAN supports multiple user accounts per company, each with their own permissions. This page explains how to manage users and how PrivateLAN protects your accounts.
User list
The user list shows all accounts for your company, including their name, username, level, roles, two-factor authentication status, enabled status, expiration date, and last activity. The list can be filtered and sorted by these columns. The Roles column shows the role preset a user's roles match, Custom (n) when they match none (n is the number of roles), None when the user has no roles, or All for an administrator.
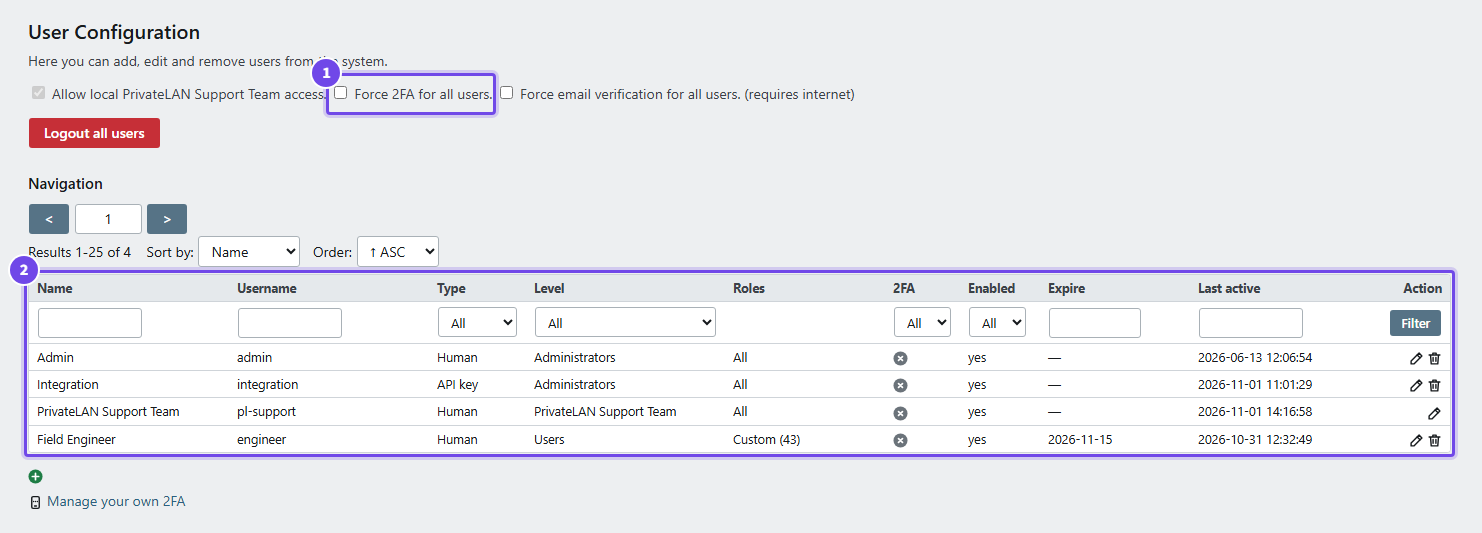
- Force 2FA for all users — one of the global security settings
- Users — with level, roles, 2FA, expiry and last activity
The number of users is not limited by your license.
Adding or editing a user
When you create or edit a user, you configure:
| Field | Description |
|---|---|
| Name | The display name of the user |
| Username | The unique login name |
| Used for password recovery and email verification | |
| Enabled | Whether the account can be used to log in |
| Expire | Optional date after which the account can no longer log in |
| Level | The user's privilege level — higher levels have more permissions |
| Password | Set when creating a user or changing an existing password |
| Roles | Fine-grained permissions for this user (see below) |
Roles
In addition to a privilege level, a user can be granted specific roles. On the user's page they are grouped by function, side by side; All and None tick or clear a whole group. A role you cannot assign yourself is shown greyed out and is kept as it is when you save.
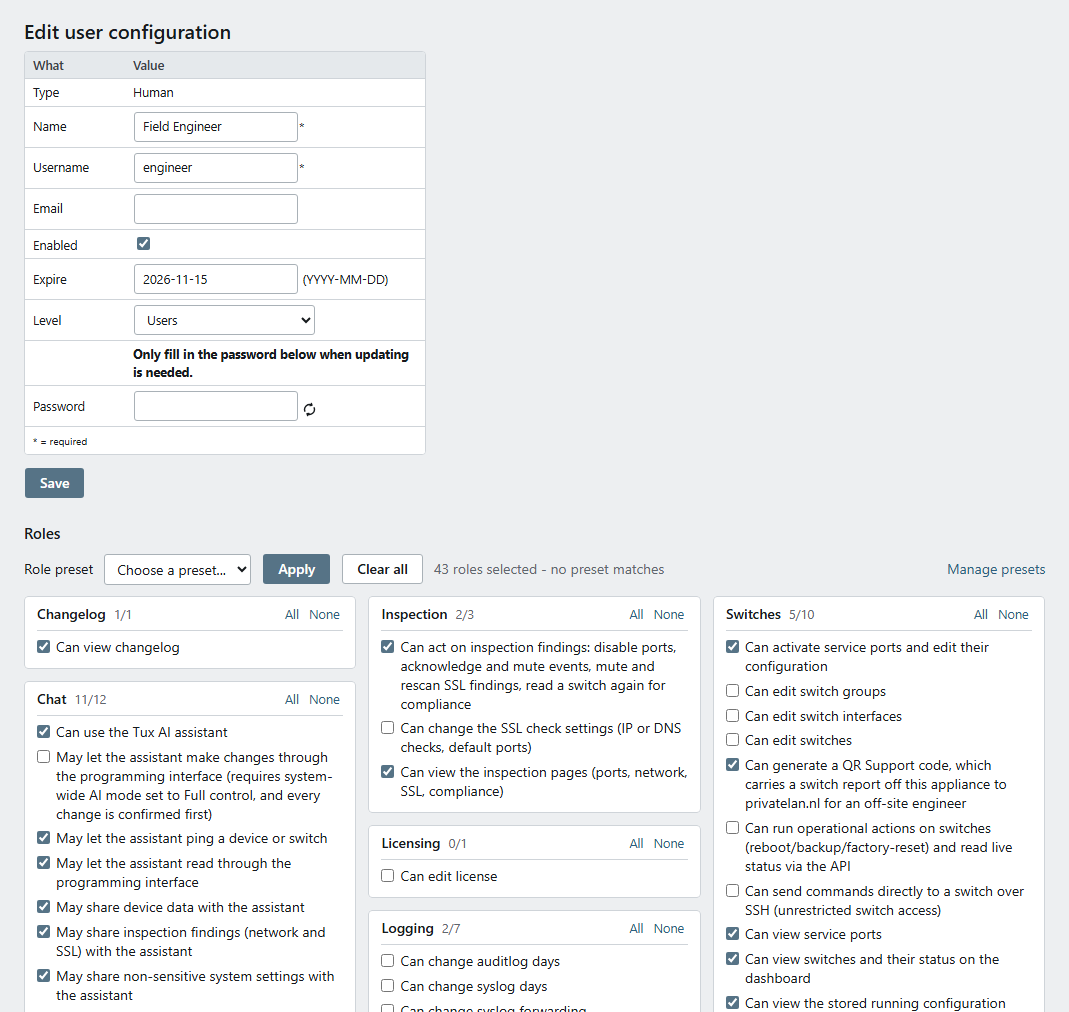
The roles for user management and the status bar are:
- users-own — manage your own user account
- users-other — manage other users' accounts
- users-support — allow PrivateLAN support to access the system locally
- users-mfa — enforce two-factor authentication for all users
- users-verify-email — enforce email verification for all users
- users-force-logout — force all other users to log in again
- users-roles — manage the role presets and review roles added by an update
- system-status — see the background tasks, processor load and number of active users in the status bar at the top of every page. Administrators have it automatically; other users keep the clock, the software version and the license, reboot and update notices, but not these details until the role is granted
With the SOC license option there are three more:
- soc-view — open the SOC live view and its alarm history
- soc-acknowledge — acknowledge, comment on, mute and close alarms
- soc-settings — change the SOC settings and the offline alarm per device group
A user with soc-view but without dashboard lands on the SOC live view after logging in and never sees the menu: the account for a control-room screen. Give every screen its own account — a second login with the same account logs the first one out.
The notifications under the bell in the status bar have three roles:
- notifications — see the notifications under the bell
- notifications-add — place a notification for all users, and remove your own
- notifications-remove-others — remove notifications placed by other users
Viewing and editing
Switches and VLANs each have a role to view them and a role to edit them:
- switches-view — see the switch list and the switch status on the dashboard
- switches — also add, edit, remove, program and reload switches
- vlan-view — see the VLAN list
- vlan — also add, edit and remove VLANs, change the routing protocol and program the VLANs into the switches
The edit role includes the view role, so a user with switches or vlan does not need the view role as well. The system role shows the health of the appliance on the dashboard: firewall, virus scanner, processor, memory, disk and network. The System menu is shown to a user who holds the role of any of its pages, such as system-security, system-sbom or changelog; each page checks its own role.
Role presets
A role preset is a named set of roles, managed under Users > Roles. On a user's page, choose a preset and press Apply to tick its roles; nothing changes until you save the user. Only roles you can assign yourself are ticked, and the page tells you when a preset holds roles you cannot assign. It also shows which preset the ticked roles match.
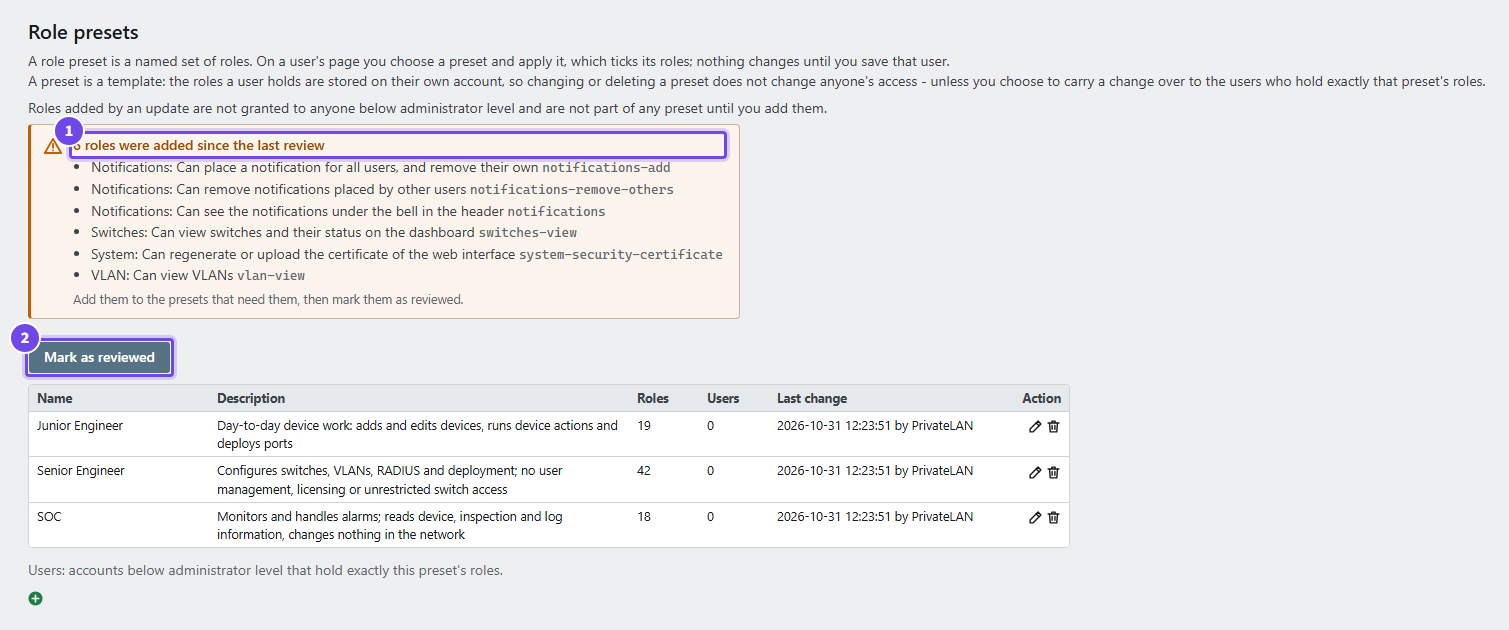
- New roles — roles added by an update since the last review
- Mark as reviewed — marks the new roles as reviewed once the presets have them
PrivateLAN comes with three presets, which you can change or delete:
| Preset | Intended for |
|---|---|
| SOC | Monitoring and handling alarms; reads device, inspection and log information but changes nothing in the network |
| Junior Engineer | Day-to-day device work: adding and editing devices, device actions and deploying ports |
| Senior Engineer | Configuring switches, VLANs, RADIUS and deployment; no user management, licensing or unrestricted switch access |
A preset is a template: the roles a user holds are stored on their own account, so changing or deleting a preset does not change anyone's access. When you change a preset, you can choose to also update the users who hold exactly the preset's current roles. Users whose roles deviate from the preset are left as they are.
New roles after an update
A new function comes with its own role, which nobody below administrator level holds until it is granted. After an update, Users > Roles lists the roles added since the last review. Add them to the presets that need them, carry the change over to the users who should have them, and mark them as reviewed.
Audit log
Every change to a user's level or roles is written to the audit log: who made it, which roles were added and removed, and which preset the new roles match. Creating, changing and deleting a preset, and carrying a change over to users, are logged as well.
Global security settings
Any user with the appropriate role can enable:
- Force two-factor authentication — every user must set up 2FA before using the system
- Force email verification — every user must verify their email address
- PrivateLAN support access — temporarily allow PrivateLAN support staff local access for troubleshooting
Any user with the users-force-logout role can also perform:
- Logout all users — immediately ends every other user's session, signing them out so they must log in again on their next visit. Your own session is not affected. Use this after a suspected compromise or when access needs to be revoked right away, rather than waiting for sessions to expire on their own.
Logging in
Log in with your username and password. If two-factor authentication is enabled for your account (or required for all users), you will be asked for a 6-digit code from your authenticator app, or one of your backup codes.
Two-factor authentication (2FA)
PrivateLAN supports TOTP-based two-factor authentication, compatible with apps such as Google Authenticator, Aegis, and FreeOTP.
To set up 2FA:
- Open the two-factor authentication setup page and start the setup
- Scan the QR code with your authenticator app, or enter the secret key manually
- Enter the 6-digit code shown in your app to confirm
Once enabled, PrivateLAN generates 8 single-use backup codes — store these somewhere safe. You can use a backup code to log in or to disable 2FA if you lose access to your authenticator app. An administrator can also reset your 2FA if you are locked out.
Forgotten password
If you forget your password, use the Forgot password link on the login page. You will receive an email with a 6-character reset code. Enter it on the Reset password page together with your new password. The code is valid for 15 minutes and can be tried five times; you can request up to three codes per hour. For security reasons, no information is revealed about whether the email address exists in the system.
PrivateLAN sends these emails, and the verification codes below, through privatelan.nl. That needs an internet connection and a license linked to the appliance's update key. Without them no email is sent; an administrator can then set a new password for you under Users.
Email verification
When you create an account or change your email address, PrivateLAN sends a 6-character verification code to that address. The code is valid for 15 minutes and can be resent up to 3 times.
